FAT32 File System
FAT32 Intro
If you made it here, you either have or are thinking about putting some storage device into your project. Of course you may want to use FAT32 or some type of file system if you are using a device such as a SD card or hard disk with a huge amount of storage space. You could read or write directly to your storage device if you wanted wish, so why use a file system such as FAT32? It is an easy way to manage data and to access data via a PC, it is user friendly for building your product and also good for users of your product.
Fat32 can be read by the most popular operating systems. Of course, FAT32 is a Microsoft product used in Windows, but Linux and MAC OS can also read FAT32. Jallib also has Minix V2 file system available.
Before you start & Requirements
Before you get started, there are a few things you need to know about the current Jallib FAT32 libraries. You will need to choose a library based on your project requirements. Be sure to choose a PIC that will suit your needs. I suggest PIC 18f4620 since it has loads of RAM & program memory. There are 2 FAT32 libraries to choose from. Here's a list of features the libraries currently have:
| Features | FAT32 | FAT32 SMALL |
|---|---|---|
| RAM (Minimum) | 1500 bytes | 256 bytes |
| Program Memory (Minimum) | 20k | 5k |
| Max Files: | Dependant on RAM available (Can use external memory) | 1 |
| List files | YES | YES |
| Create files | YES | NO |
| Read & Write to files | YES | YES |
| Read long file names | YES | YES |
| Write long file names | NO | NO |
| Max Partitions | 4 primary, 0 extended | 1 primary |
| Read/Write fragmented files & directories | YES | NO |
| Max file fragments | Dependant on RAM available (Can use external memory) | 1 |
| Max directory fragments | Dependant on RAM available (Can use external memory) | 1 |
This tutorial will concentrate on the normal FAT32 library. There will be a separate tutorial for FAT32 SMALL whenever I find time!
Choose a storage device
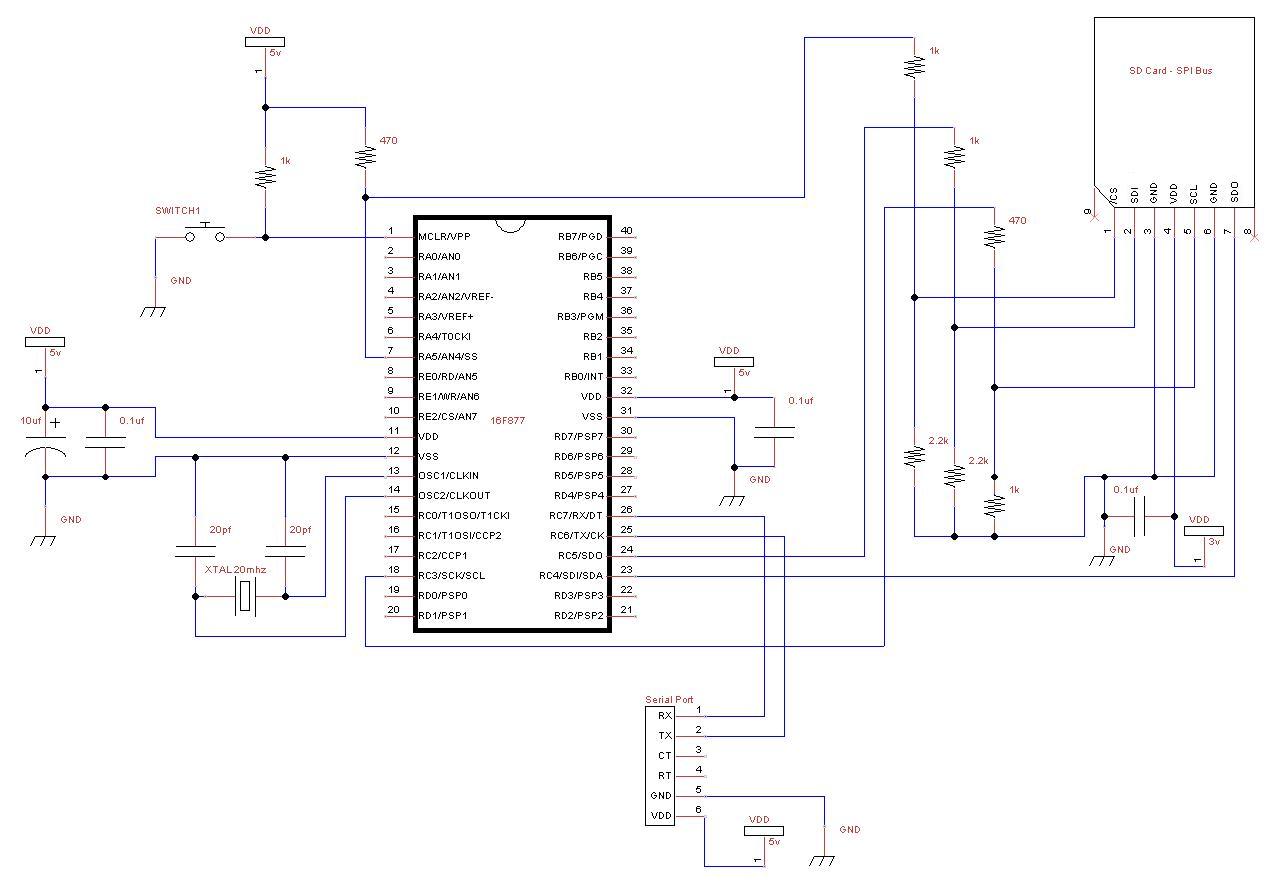
SD cards - SD cards are popular thanks to their small size. They are quite easy to connect to your circuit. The hookup will cost you 4 PIC pins via SPI port. They are slower then hard disks due to serial data transfer via SPI port. Most SD Cards also have an endurance of 100,000 write cycles. They run on 3.3v.
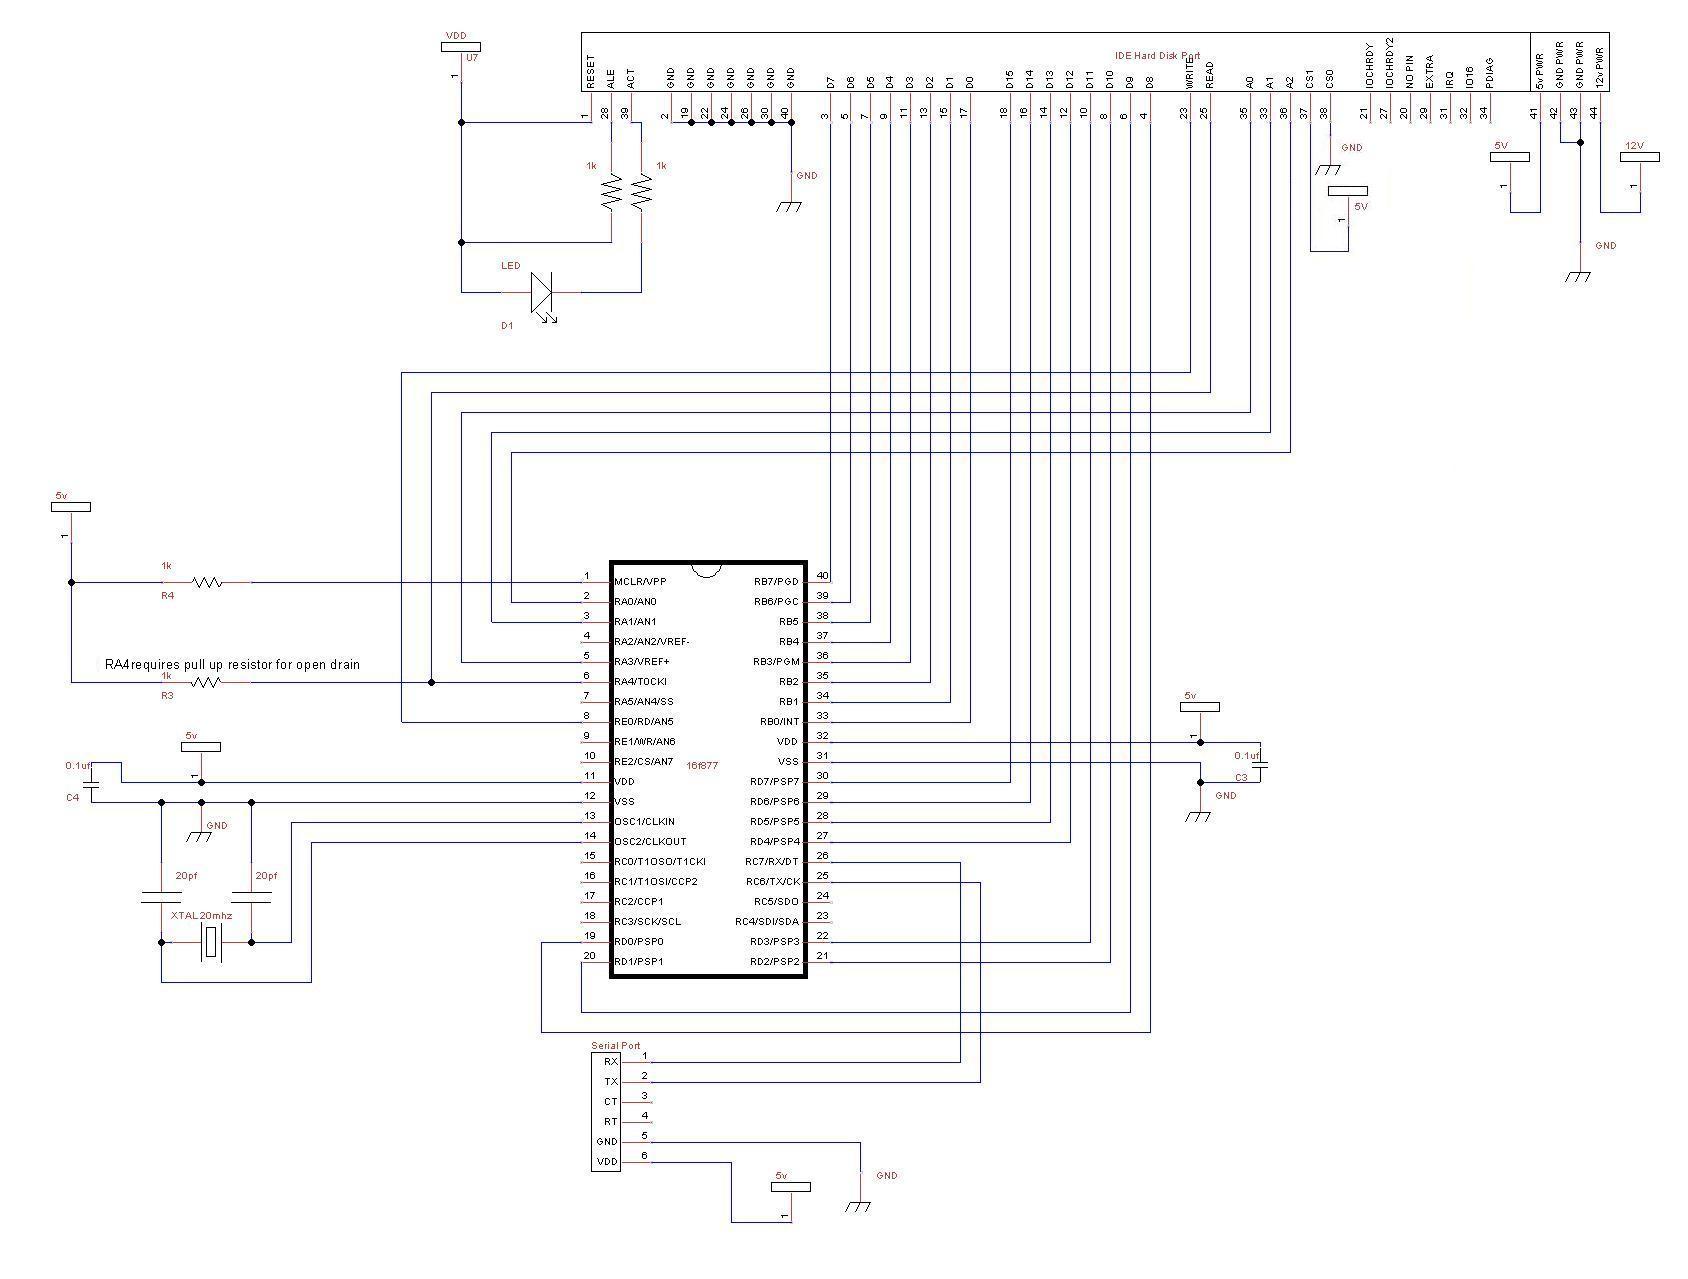
Hard Disk - Hard drives are fast but large. The main sizes of hard disks are 3.5", 2.5" and 1.8". Connecting them to your circuit is simple, but will require 21 pins. I did actually fit sd card + hard disk in one circuit on 18f4620. Hard drives have an unlimited number of write cycles. They run at 5v TTL levels, but will accept 3.3v on it's inputs. You can run your PIC at 3.3v or 5v.
Suggested Tutorials
Benefits of ICSP
- You may program your PIC while it is in your breadboard circuit
- You may program your PIC while it is on a soldered circuit board
- You will save time programming so you can write more code faster
- You can reset your circuit from your PC
- You can program surface mount PIC's that are on soldered circuit board
- You won't bend or break any pins
- You won't damage your PIC by placing it in your breadboard wrong
- With a remote desktop software like VNC, you can program your PIC from anywhere around the world.
- I can program my PIC in my living room on my laptop while I watch tv with my wife! (I keep my mess in my office)
The Schematic
Your schematic will be the same as either the hard disk or sd card tutorial. If you wish to use external memory, you can add a 23k256. I'll explain external memory later on. Although the schematics show 16f877, you can replace it with 18f4620. 16F877 is not large enough.
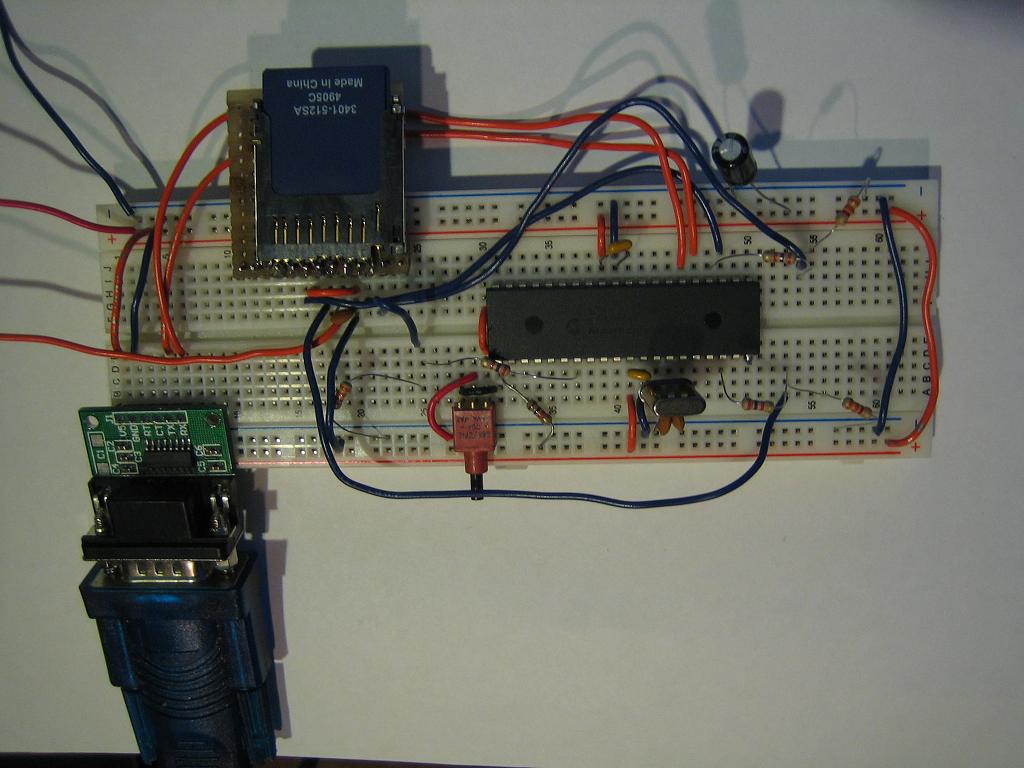
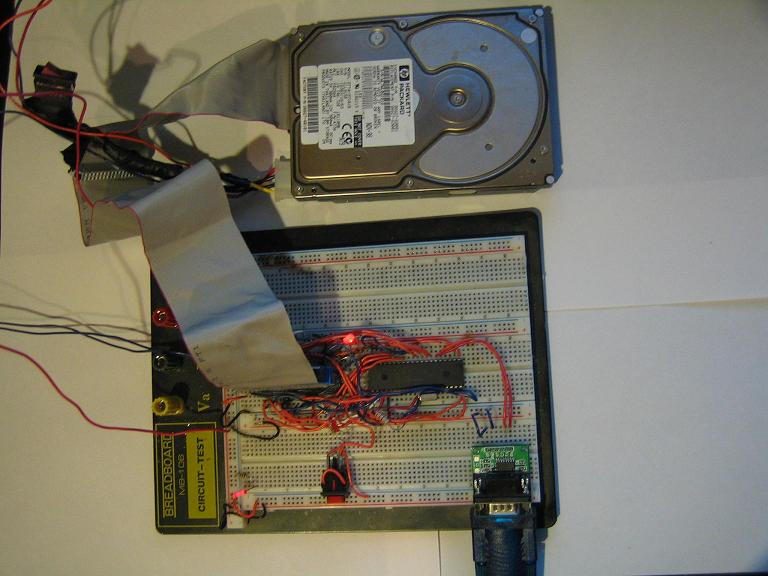
Some Images
Run a sample
If you've already done a previous sd card or hard disk tutorial, you know you have a working circuit. I suggest you try one of the following samples:
18f4620_fat32_pata_hard_disk.jal
18f4620_fat32_sd_card.jal
Start by formatting your storage device in windows. Then put a few files and a directory on it. In this example I put 4 files and one directory.
Set your serial port to 115200 baud. If all is good, you should get a directory listing on your serial port software:
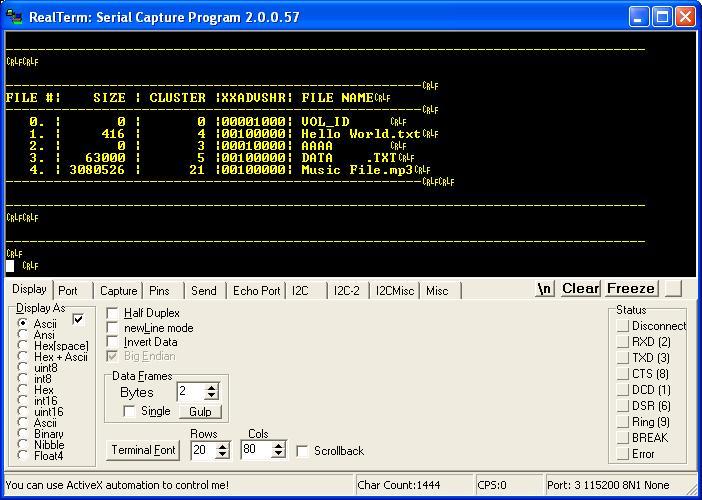
While we have this sample running, let's try it out!
Each file is identified by a number. The first one "0" is the volume id. The partition loaded is named "VOL_ID". You will also see 3 files and one directory. The directory is named "AAAA" (number2). You can identify directories by their attributes "00010000".
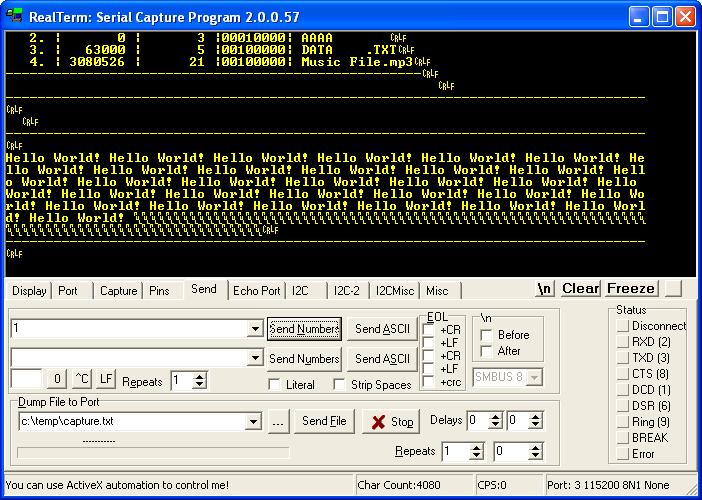
Now just send a number via Realterm's "Send" tab. If you send the number 0, you will list the same root directory again. If you send the number of a file, It's contents will be displayed. If you send the number of a directory, you will go into that directory and it's contents will be listed. Here's what I get when I send the number "1".
You will notice some junk at the end of the file. Usually you'll get a bunch of 0's. They are there because fat32 reads & writes in 512 byte chunks, and the file is only 415 bytes long. You can fix your software to stop at the correct byte at the end of the file.
The Code
Alright then, we're ready to get our hands dirty. Let's take a look
Required Includes
The first part of the sample is just a bunch of includes, I'm not going to cover the first includes to much since they are covered in other tutorials. When we get to the fat32 include, I'll give more detail.
-- Title: FAT32 library for reading fat32 filesystem
-- Author: Matthew Schinkel, copyright (c) 2009, all rights reserved.
-- Adapted-by:
-- Compiler: >=2.4k
--
-- This file is part of jallib (http://jallib.googlecode.com)
-- Released under the BSD license (http://www.opensource.org/licenses/bsd-license.php)
--
-- Description: this example reads files & folders from a fat32 formatted sd card
--              using the fat32 library.
--
-- Sources:
-- http://www.microsoft.com/whdc/system/platform/firmware/fatgen.mspx
-- http://www.pjrc.com/tech/8051/ide/fat32.html
-- http://en.wikipedia.org/wiki/File_Allocation_Table
--

-- include chip
include 18f4620                   -- target picmicro
-- this program assumes a 20 mhz resonator or crystal
-- is connected to pins osc1 and osc2.
pragma target osc INTOSC_NOCLKOUT              -- hs crystal or resonator
;pragma target osc hs              -- hs crystal or resonator
;pragma target clock 20_000_000    -- oscillator frequency
pragma target clock 32_000_000    -- oscillator frequency
--
pragma target wdt  disabled
pragma target lvp  disabled
pragma target MCLR external        -- reset externally
--;
;OSCCON_IRCF = 0b110   -- set int osc to 4mhz
OSCCON_IRCF = 0b111   -- set internal osc to 8mhz
OSCTUNE_PLLEN = true  -- multiply internal osc by 4
;--
enable_digital_io()                -- make all pins digital I/O
--
_usec_delay(100_000) -- wait for power to settle


include delay

-- setup uart for communication
const serial_hw_baudrate  = 115200   -- set the baudrate
include serial_hardware
serial_hw_init()
-- some aliases so it is easy to change from serial hw to serial sw.
alias serial_write is serial_hw_write
alias serial_read is serial_hw_read
alias serial_data is serial_hw_data
alias serial_data_available is serial_hw_data_available


include print

include spi_master_hw         -- includes the spi library
-- define spi inputs/outputs
pin_sdi_direction = input    -- spi input
pin_sdo_direction = output   -- spi output
pin_sck_direction = output   -- spi clock
--
spi_init(SPI_MODE_11,SPI_RATE_FOSC_4) -- init spi, choose mode and speed
alias spi_master is spi_master_hw


-- setup 23k256 for external memory
-- setup chip select pin
ALIAS sram_23k256_chip_select             is pin_a1
ALIAS sram_23k256_chip_select_direction   is pin_a1_direction
-- initial settings
sram_23k256_chip_select_direction = output    -- chip select/slave select pin
sram_23k256_chip_select = high                -- start chip slect high (chip disabled)
-- initalize 23k256 in byte mode
alias sram_23k256_force_spi_mode is spi_master_hw_set_mode_00 -- always set spi mode to 0,0
include sram_23k256 -- setup Microchip 23k256 sram
sram_23k256_init(SRAM_23K256_SEQUENTIAL_MODE, SRAM_23K256_HOLD_DISABLE)  -- init 23k256 in sequential mode


-- setup the sd card pins
alias sd_chip_select is pin_SS
alias sd_chip_select_direction is pin_SS_direction
sd_chip_select = high
sd_chip_select_direction = output
--
-- setup the sd card library
alias sd_force_spi_mode is spi_master_hw_set_mode_11 -- always set spi mode to 1,1
;const bit SD_EXTRA_SPEED = TRUE
const bit SD_ALWAYS_SET_SPI_MODE = TRUE
const bit SD_DELAY_AFTER_WRITE = TRUE
include sd_card              -- include the sd card ide hard disk library
sd_init()                    -- initialize startup settings
Include the FAT32 library
Now for the fat32 include. You will need to modify some of the constants to fit your need. Here's a long description of each constant so you have some idea of what to use in your project.
FAT32_WRITE_LONG_FILE_NAMES - Enables writing of long file names. This is not currently implemented. Keep it FALSE for now.
FAT32_FILES_MAX - The maximum number of files per directory. Each file will take up 2 bytes of ram. You can use external memory for this. I'll explain more about external memory soon.
FAT32_FILE_NAME_SIZE - The maximum size of a file name. larger sized file names take more RAM space. If a file name is larger then this constant, some of it's characters will get cut off during listing of a directory.
FAT32_DIR_FRAGMENTS_TO_ALLOW - The number of fragments a directory may have. Requires 6 bytes of RAM space per fragment allowed. This will use PIC's internal memory at the moment. I'll probably change this so you can use an external memory source.
FAT32_FILE_FRAGMENTS_TO_ALLOW - The number of fragments a file may have. Requires 8 bytes of RAM space per fragment allowed. This will use PIC's internal memory at the moment. I'll probably change this so you can use an external memory source.
FAT32_ENTRIES_MAX - highest file entry address can be 65535. Changing this is only for advanced users. I'll have to give a better description of this sometime. Basically each file entry (not file name) is 32 bytes long. FAT32 lib reads all entries and stores important entry locations into RAM. The important entries are entries that are the beginning of a file name. When a file number is called, the library will go to the entry address to read the file name, size, cluster address etc. This way the entire file name list does not need to be stored in RAM. Only the location of the file name gets stored.
FAT32_USE_INTERNAL_MEMORY - Choose where to store FAT32's file location table (internal memory or external memory). This is related to FAT32_FILES_MAX. If you have 50 files max, each file will take 2 bytes of ram, so 100 bytes ram. Choose weather you want this 100 bytes of ram to be used internally or on an external memory device. For external memory, I very much suggest external RAM or something fast and with a high endurance (write cycles) like 23k256. This will of course affect the "if" statement that follows this constant.
Within the FAT32_USE_INTERNAL_MEMORY "if" statement, you will need to define an array named "fat32_entry_location". This array can be a real array, a large array (through the large array lib) or a pseudo array. If you look in the 23k256 lib, you will see that sram_23k256_word[] is a pseudo (fake) array. For external memory we simply alias a pseudo array "alias fat32_entry_location is sram_23k256_word"
And of course, here is a sample block for including fat32. You can keep the defaults for now and mess around with them later. I kept the values low to save RAM space.
-- setup fat32 --
-- include the required files
;include pic_data_eeprom
-- change these vaues to save memory
const bit FAT32_WRITE_LONG_FILE_NAMES = FALSE -- support writing of long file names
const word FAT32_FILES_MAX = 20            -- the max number of files allowed in a directory
const byte FAT32_FILE_NAME_SIZE = 80        -- choose max file_name size. if a file_name is longer the this, beginning chars will be cut. short file_names are 12 bytes.
const FAT32_DIR_FRAGMENTS_TO_ALLOW = 5     -- uses 6 bytes memory per fragment allowed (0 not allowed)
--                                          -- windows defrag does not defragment directories.
const FAT32_FILE_FRAGMENTS_TO_ALLOW = 5    -- uses 8 bytes memory per fragment allowed (0 not allowed)
--
-- experts may change the following values
;const byte FAT32_ENTRIES_MAX = 1           -- highest file entry address can be 256
const byte FAT32_ENTRIES_MAX = 2            -- highest file entry address can be 65535
--
-- choose a memory source for the file list
const bit FAT32_USE_INTERNAL_MEMORY = TRUE -- Use internal memory for file location list
IF FAT32_USE_INTERNAL_MEMORY == TRUE THEN
   -- Setup a large array for storing sector data, This is where file_name locations are stored
   const dword LARGE_ARRAY_2_SIZE = FAT32_FILES_MAX               -- choose number of array variables
   const dword LARGE_ARRAY_2_VARIABLE_SIZE = FAT32_ENTRIES_MAX    -- choose bytes size of variables
   include large_array_2                    -- include the array library
   ALIAS fat32_entry_location is large_array_2
elsif FAT32_USE_INTERNAL_MEMORY == FALSE THEN
   -- put your own code here if you wish to allow massive amounts of files per directory

   -- example usage of 23k256 for external memory

   -- alias the 23k256 device word array
   ;alias entry_location is sram_23k256_byte  -- highest file entry address can be 256
   alias fat32_entry_location is sram_23k256_word   -- highest file entry address can be 65535
END IF
--
include fat32   -- include fat32 library -- include fat32
You may want to filter out some files such as hidden or system files which you may not need in your project.
-- CHOOSE FILE ATTRIBUTES TO FILTER OUT
fat32_filter_is_read_only  = FALSE
fat32_filter_is_hidden     = FALSE
fat32_filter_is_system     = FALSE
fat32_filter_is_volume_id  = FALSE
fat32_filter_is_directory  = FALSE
fat32_filter_is_archive    = FALSE
The main program
Well then, your ready for the main program. First we have a few inital settings.
I have created a simple seperator procedure to send a line "-----------" via serial port.
-- procedure for sending 80 "-----------------" via serial port
procedure separator() is
   serial_data = 13
   serial_data = 10
   const byte str3[] = "--------------------------------------------------------------------------------"
   print_string(serial_data, str3)
   print_crlf(serial_data)
end procedure

-- start of main program
separator()-- send "----"
We can now initialize the library. The input to fat32_init is the partition number, which will usually be the first (partition 1).
fat32_init(1) -- initialize fat32, go to 1st primary partition's root dir "\"Now some good coding stuff, let's print a directory to the serial port. The first dir listing is the root dir. There are some options we can choose for the print dir procedure.
FAT32_PRINT_LONG_FILE_NAME - print the file name
FAT32_PRINT_NUMBER - print the file number
FAT32_PRINT_SIZE - print the file size
FAT32_PRINT_CLUSTER - print the file's cluster address
FAT32_PRINT_TABLE - print a table around everything
FAT32_PRINT_DATE - print the file date
FAT32_PRINT_ATTRIBUTES - print the files attributes (such as read only, hidden, etc).
The file attributes are "ADVSHR" (you will see this on your serial port software), and each can be true or false.
A - Is Archive
D - Is a directory
V - Is a volume ID
S - Is a system file
H - Is a hidden file
R - Is read only
fat32_print_directory(serial_data, FAT32_PRINT_ALL) -- sends dir listing via serial portOf course, you could just print one file name at a time instead. This could be useful on an LCD where you can only view a certain number of files at a time, and scrolling is needed.
-- read 3rd file's name, location, size, attributes into memory
fat32_read_file_info(3)

-- now send the filename via the serial port (file number and file name)
fat32_print_file_info(serial_data,FAT32_PRINT_NUMBER + FAT32_PRINT_LONG_FILE_NAME)
Declare some variables we're going to use, then start our main loop
var byte data
var dword step1
var word step2
var byte file_number = 0

forever loop
   separator() -- send "-----" then loop and wait for user input
This example is a user program, so we will wait for the user. The user can send data to the device via serial port to select a file number. So, let's wait for data.
Note that the serial software library does not contain a serial_data_available variable.
When we get data from the user, it will be placed into our variable file_number.
file_number = serial_dataNow we can either check the file's attributes to see if it is a file or directory (see fat32_file_attrib in fat32.jal), or we can simply try to go into the directory. If we fail to go into the directory, it must be a file.
If we do go into the directory, we will print the new directory to the screen.
   -- choose a file for reading or dir for opening
   if fat32_cd(file_number) then             -- if change directory is successful
      fat32_print_directory(serial_data, FAT32_PRINT_ALL) -- print dir listing
Otherwise (if it is not a directory), we will open the file.
elsif fat32_file_open(file_number) then -- if go into file is successfulCalculate the number of sectors in a file
The fastest way to read files is by reading them sector by sector. We'll need to calculate how many sectors are in the file so we can use a for loop later on.
      -- calculate number of sectors in file
      var dword sectors_available
      if (fat32_file_size) == (fat32_file_size / 512) * 512 then
         sectors_available = (fat32_file_size / 512)
      else
         sectors_available = (fat32_file_size / 512) + 1
      end if
Reading & writing
While writing the FAT32 library, I wanted to give some different ways for the code writer to read & write to a file.
- Read any byte from a file at any address.
- fat32_read_file_byte_address(address) - function that returns a byte from any byte address in the file.
- A faster way to read byte by byte. Still slower then sector reads.
It is not so user friendly since you must call a few procedures. Only
reads starting at the beginning of a file. If you are using an sd card
and have other SPI devices connected, do not use them until you do
stop_file_read.
- fat32_start_file_read() - start reading a file from the beginning
- fat32_read_file_byte() - read one byte
- fat32_stop_file_read - stop reading
- A very fast & user friendly way to read and write to a file at
any sector address of the file.
- fat32_sector_buffer[] - a 512 byte array that stores data to be read or written
- fat32_read_file_sector_number(address) - Call this to read data into the buffer from any address.
- fat32_write_file_sector_number(address) - Call this to write sector buffer to media at any address.
- The fast way to read and write to a file. A little bit faster then
#3. Not as user friendly. You must start reading or writing at the
beginning of the file. Read and write sector by sector by filling
fat32_sector_buffer[]
- fat32_sector_buffer[] - a 512 byte array that stores data to be read or written
- fat32_start_file_write() - start writing to a file, starting at the beginning of the file.
- fat32_stop_file_write() - stop writing to a file
- fat32_start_file_read() - start reading from a file, starting at the beginning of the file.
- fat32_stop_file_read() - stop reading from a file
Well, as you can see you have a lot of options. Our sample uses #3 (fast and user friendly). It really depends on your application. If you are recording sound, you may want #4 since you'll be starting at the beginning of the file. If you are jumping around in the file, you may want #3. Of course #3 would be perfectly sufficient for recording sound. You'll just have to try them out!
I'll give a bit more explanation of #3. You will obviously either read from the storage device or write to the storage device.
For writing, you will first fill the sector buffer with data, then when you call fat32_write_file_sector_number(address), the library will transfer the data from the buffer onto the storage device.
      -- EXAMPLE 3 WRITE (fast and user friendly)
      -- Read from any sector number in the file, in any order you wish.
      for sectors_available using step1 loop

         -- set the data to be written
         for 512 using step2 loop
            fat32_sector_buffer[step2] = "E"
         end loop

         -- write one sector to the disk
         fat32_write_file_sector_number(step1)
      end loop
For reading, you will first choose the sector to read from, then call fat32_read_file_sector_number(address), the library will transfer data from the storage device into the sector buffer. After the data is in the sector buffer array, you can do what you like with it.
      -- EXAMPLE 3 READ (fast and user friendly)
      -- Read from any sector number in the file, in any order you wish.
      for sectors_available using step1 loop
         -- read one sector from the disk
         fat32_read_file_sector_number(step1)
         -- send the sector via serial port
         for 512 using step2 loop
            serial_data = fat32_sector_buffer[step2]
         end loop
      end loop
Well, that was awsome, let's wrap this up! You should close the file when your done with it, just to ensure your storage device goes ready. On a hard disk, you will see the disk LED go off.
      fat32_file_close()
   end if
end loop
What's that now? You want to see an example of this working? I guess it's time for a Youtube Video! You can see me easily moving around in files & directories, and even transferring an MP3 to my PC via Realterm!
http://www.youtube.com/watch?v=ar7DkTPriNk
Have fun!